DIY BMW 2002 clutch pedal linkage

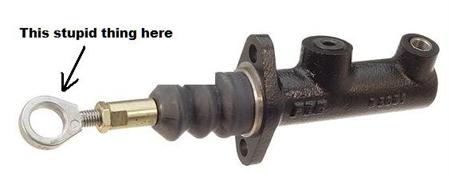
Yes, that stupid little lollipop linkage made of the world’s weakest pot metal mysteriously snapped on Uber’s clutch pedal. As far as I can tell, I must have knocked the clutch pedal a bit sideways while welding up the driver side floorboard/rocker panel in preparation for Vintage at the Vineyards and sheared the threaded piece right off.

And, unfortunately, a replacement part doesn’t seem to actually exist unless you buy a new clutch master cylinder with which the linkage is included.

Continue reading “DIY BMW 2002 clutch pedal linkage”

Penetrating oils comparison

Just posting up a copy of an e-mail that has been circulating around the web recently. I have no idea if this is an actual study or internet lore. This is more for my reference so it’s easier to find, but I hope someone else gets some use out of it too.

The subject came up today while moving an engine for a buddy. His friend was trying to remove a stuck steering knuckle on an old wagon chassis. Then later today this e-mail popped up on a 2002 list I’m on. I mis-quoted this e-mail today and suggested a mixture of hydraulic oil and kerosene for the wagon. I imagine it would probably do a decent job of unsticking rusty bits.

*The April 2007 “Machinist’s Workshop” magazine comparison
test.*

*They arranged a subjective test of all the popular penetrants with
the control being the torque required to remove the nut from a
“scientifically rusted” environment. *

Penetrating oil ….. Average load*

None ………… ……… 516 pounds
WD-40 ………… …… 238 pounds
PB Blaster ………… . 214 pounds
Liquid Wrench ….. 127 pounds
Kano Kroil ………… 106 pounds
ATF-Acetone mix….53 pounds

*The ATF-Acetone mix was a “home brew” mix of 50 – 50 automatic
transmission fluid and acetone.*

*Note the “home brew” was better than any commercial product in this one
particular test. Our local machinist group mixed up a batch and we all
now use it with equally good results. Note also that “Liquid Wrench” is
about as good as “Kroil” for about 20% of the price. *

*Your experience may vary, etc., etc.*

MINI thermostat replacement

So the new car was giving us some troubles. A little bit of coolant leakage now and then resulted in a sloshing sound coming from the heater core behind the dash. Coolant leaks out, some air gets in, suddenly you have some sloshing when you rev the engine. No big deal…unless you’ve lost so much coolant that you end up with say, a warped head gasket. My old college ride GMC S-15 had these exact symptoms, and sadly, the above diagnosis. $600 lost.

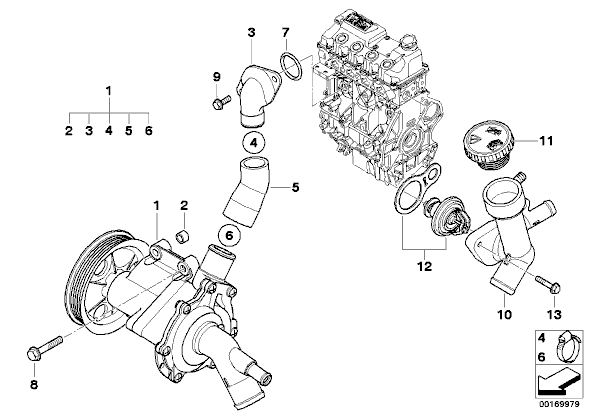
As was the case with the Jimmy, I first assumed the coolant overflow tank was leaking (a common first generation MINI Cooper fail point until it was updated mid-run). Not so. Turns out the MINI R50/R53 thermostat housing is somewhat notorious for leaking. It’s plastic, unsurprisingly. I’ve also heard reports the Dodge Neon that used a nearly identical engine had similar issues…again, plastic parts. I ordered up some new parts from my the nearest MINI dealer and off we go.

Parts #10 and #12 from this diagram:

Continue reading “MINI thermostat replacement”

Update what now?

Good god, almost a year since an update. Well, rest assured there has been some work done on various vehicles, I even have some pictures. A third brake light on the Verona car (Uber) along with a new parcel shelf. The turkis car slowly moves towards paint. Bondo dust is imminent.

More to come, I swear!

02 cupholder mod

My buddy Mike from Raleigh came up with a clever way to install a set of after market cupholders in his BMW 2002. Mike says:

After years of my wife riding around with me and saying “You make everything else, why can’t you make us some cupholders for these little cars!” I got to rummaging around at Advanced Auto today and saw these little soft pockets. It reminded me of the soft pocket that my wife has in the MINI console where she throws everything so I grabbed a couple and thought I would give it some thought. Pics show the little mount I fabbed up with some steel rod which mounts to the end of the console using the existing console screws.

Check ’em out:


Continue reading “02 cupholder mod”

Turkis driver side quarter panel

After a month of inactivity in the garage due to traveling and hosting friends, I finally got back to work on the car. The driver side rear quarter panel had initially looked as though it could get by with just a bit of bond-o work. But upon further inspection I decided to just chop out the damaged/body-filled section and weld in a patch just as I did for the passenger side.


Continue reading “Turkis driver side quarter panel”

Tool Review: Tillman ONYX TIG Welder gloves

I found these amazing gloves at my local welding shop. They are just fantastic! I would wear them anywhere.

Despite the fact that they look as Darth Vader as possible, they are comfortable, soft and provide a great sense of touch and control with a welder in hand. They must be made from the skin of young children, they are that soft.


Continue reading “Tool Review: Tillman ONYX TIG Welder gloves”

Rocker panel welderin’

I realize I’m going a bit out of order here but,

Before I set to doing the fender flare modification, I had to fix a bit bunch of rocker panel rust and Bond-O. I don’t have any before pictures at this time, but don’t worry. The driver side remains to be fixed and I’ll take more detailed pictures for a post at a later date. This is the tale of the passenger side.


Continue reading “Rocker panel welderin’”

Turkis quarter panel

The poor Turkis car must have been mistreated in a previous life. What I thought were rusty rear wheel arches turned out to be dented and wrinkled quarter panels loaded with…yes, Bond-O, as you may have guessed. Both the passenger and driver sides are affected but luckily very little rust is in the area. There must have been some sort of side impact(s) or maybe even a rear-end collision, although the tail section looks original.

I’ll have more detailed pictures of the driver side patch, but here are the few shots of the work I’ve done thus far on the passenger side.


Continue reading “Turkis quarter panel”

Rear seat delete

Originally my ’74 Verona, Uber, came with a set of modified 6-series (E24) rear seats. While these seats looked the business, they rarely got used, were the wrong color and were begging to be yanked. Since we do a lot of fairly long distance traveling to rallies and shows, I decided to remove the rear seat entirely and convert the space to a more usable storage area.

What you will need for this project:

-a 4×2 feet sheet of plywood
-a couple cans of spray adhesive
-a jig saw
-about 6 feet of carpet (6 feet wide)
-sandpaper or a hand sander
-carpet tape
-velcro


Continue reading “Rear seat delete”