
So the new car was giving us some troubles. A little bit of coolant leakage now and then resulted in a sloshing sound coming from the heater core behind the dash. Coolant leaks out, some air gets in, suddenly you have some sloshing when you rev the engine. No big deal…unless you’ve lost so much coolant that you end up with say, a warped head gasket. My old college ride GMC S-15 had these exact symptoms, and sadly, the above diagnosis. $600 lost.
As was the case with the Jimmy, I first assumed the coolant overflow tank was leaking (a common first generation MINI Cooper fail point until it was updated mid-run). Not so. Turns out the MINI R50/R53 thermostat housing is somewhat notorious for leaking. It’s plastic, unsurprisingly. I’ve also heard reports the Dodge Neon that used a nearly identical engine had similar issues…again, plastic parts. I ordered up some new parts from my the nearest MINI dealer and off we go.
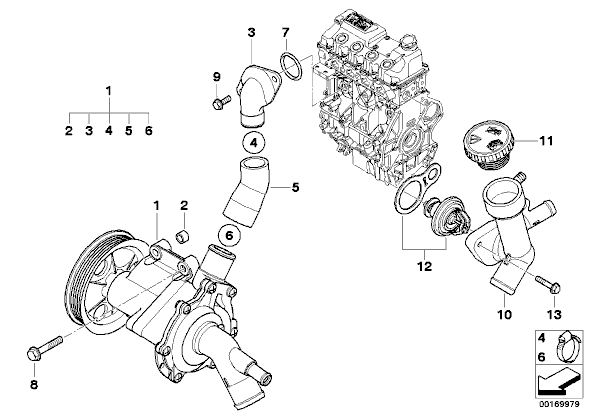
Parts #10 and #12 from this diagram:
The install itself would have to be classified as easy peasy. But, to get to the t-stat and housing, you need to, at minimum, remove your airbox or cold air intake filter and heat shield, for the MINI Cooper R50 only, that is. For the R53 supercharged engine, I believe the supercharger has to be removed, but I’m not certain.
You may find it easier to get at the 3 measly bolts that hold the thermostat housing on if you remove the battery/battery box as well. I found that all I really had to do was unbolt the positive cable, but you should remove both battery cables from the battery to be safe…no arcing, please. With the cable out of the way, I had just enough room to work.
Tools required: a 10mm socket, 6″ socket extension, flat head screw driver, channel lock pliers, some new hose clamps (get rid of those terrible spring clamps and buy some proper clamps i.e. – the ones with the worm drive and RIDGES, not holes), some good ol’ blue BMW coolant, distilled water, a catch can of some sort and a free afternoon.
Drain as much coolant from the overflow tank as you can, I used a 60ml syringe and a piece of old refrigerator ice machine tubing. Then, open the radiator fill cap (that plastic cap on the top of the housing) and suck up as much coolant as you can. Use Channel Lock pliers or similar to help remove the two spring clips from the hoses attached to the housing then pull the hoses free. Remove the three bolts that hold the housing to the block and be ready with a catch can below your transmission, about half a pint of coolant will spill. Pull out the old housing and thermostat. Take note of which direction the thermostat is installed! Carefully clean the face of the block of any old, dried, blue boogers of coolant and install the new part. I placed the new thermostat into the housing facing the correct way and carefully installed it. You’ll need to move some wires and cables around to get a good angle on the mounting point. It takes a couple tries to get it in there (that’s what she said /obligatory) without the thermostat falling out, but you’ll get it. You’re smart.
Re-bolt and re-attach everything as before and add some 50/50 BMW coolant/distilled water mix. I added the coolant mix through the fill cap but I also gave the radiator hose on the passenger’s side (#5 in this diagram) a good squeeze to force out any air bubbles. There was quite a bit of air in the system, to my surprise. So, I just kept filling the housing neck up to the top, squeezing the hose until bubbles popped up and repeated until the coolant level stopped bubbling with every squeeze and never dropped. Cap the radiator fill, add more coolant to the overflow tank and that’s that. On the first drive let the engine warm up, drive around a bit and check for leaks.